Taking a Girls Trip Back in Time

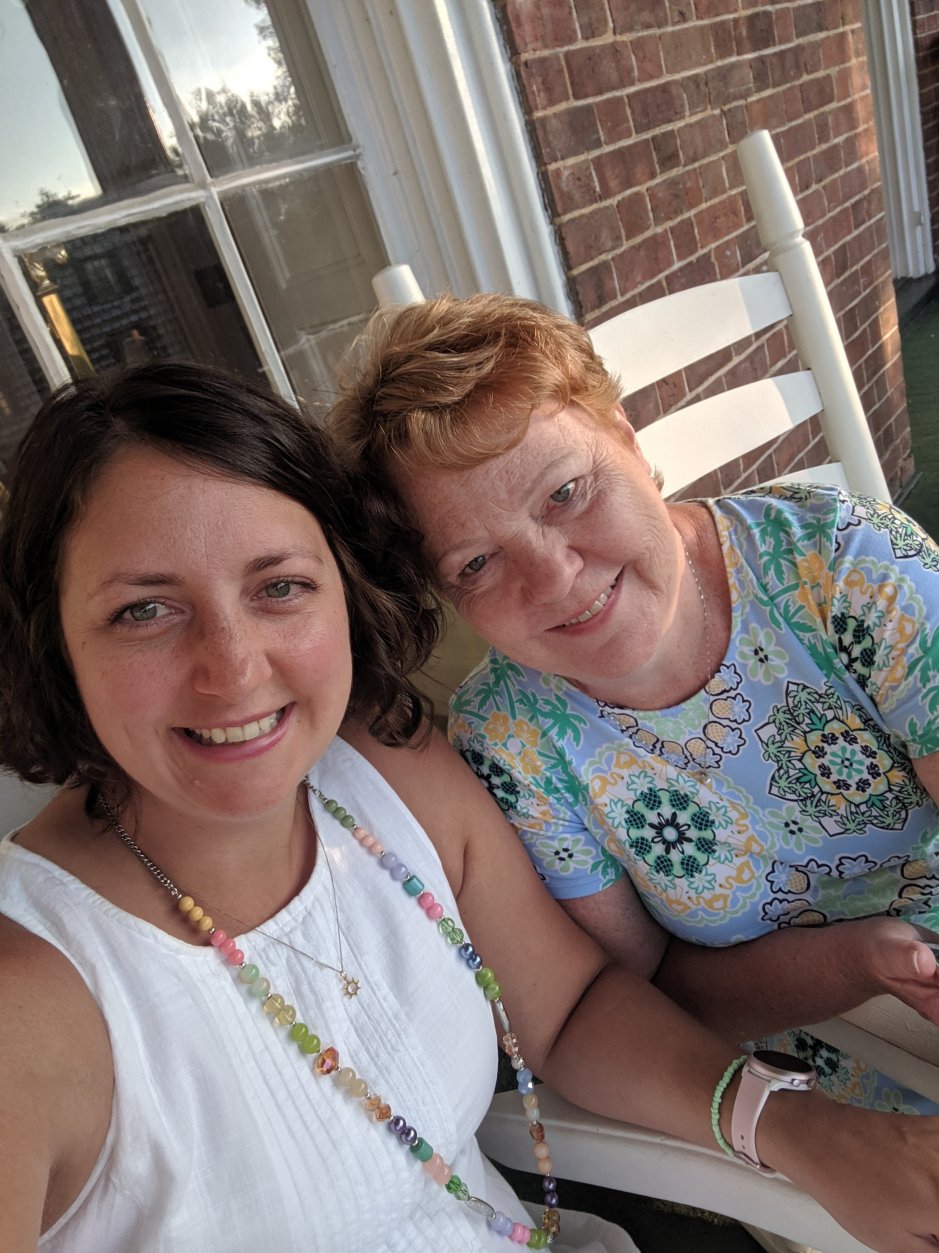
Recently my mom and I went on a weekend long girls trip, something we are trying to do every couple of years. In honor of what would have been my late Grandma’s 99th birthday (Aug 9th), we took a trip back in time to Abingdon, VA. A small town about 3 hours north of Charlotte, Abingdon is rich with history and theater, good eats, and antiques shopping.

Arriving midday Friday, we checked in at “the Martha“. The AC unit had broken in our reserved room so we got upgraded to a quaint suite on the top floor! Built in 1832 the Martha Washington Inn was originally home to General Robert Preston. Nearly 30 years later the home was purchased for $21,000 and turned into an upscale women’s college, and named after first lady of our nation, Martha Washington. It served as a college for 70 years through the Civil War and Great Depression, where it was also used as a makeshift hospital for wounded soldiers. In 1935, the Martha was opened as a hotel and has hosted Eleanor Roosevelt, President Harry Truman, Lady Bird Johnson, Jimmy Carter, and Elizabeth Taylor. The grounds are centered around a beautiful fountain, lush with bright flowers and large trees. It was calm and peaceful.

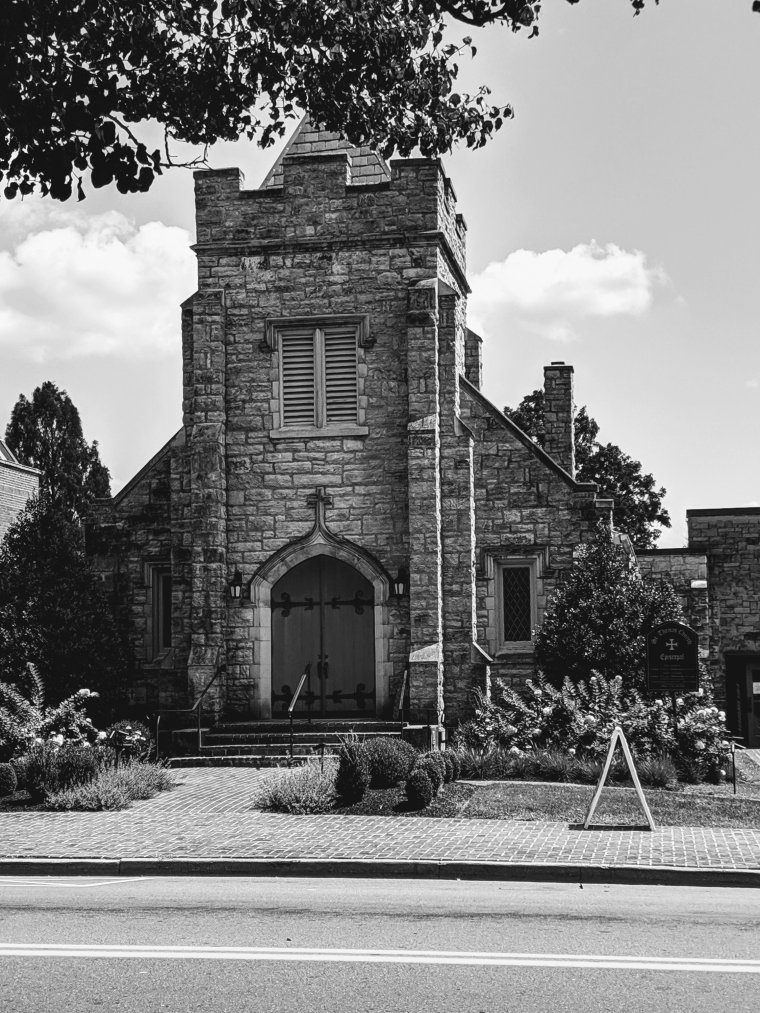
Another jewel of Abingdon is the Barter Theater. My grandma once told stories of the Barter Theater, the longest running professional theater in the nation, opening in 1933. It was called the Barter Theater because during the Depression, people could trade goods for a ticket to the show, or “ham for Hamlet”. On Saturday, we were fortunate to see one of the funniest plays I’ve ever seen, Exit Laughing. It had us laughing so hard our cheeks hurt. Coupled with a sentimental message of always living life to the fullest, it was a heart warming reminder of why our girls trip tradition is so important.

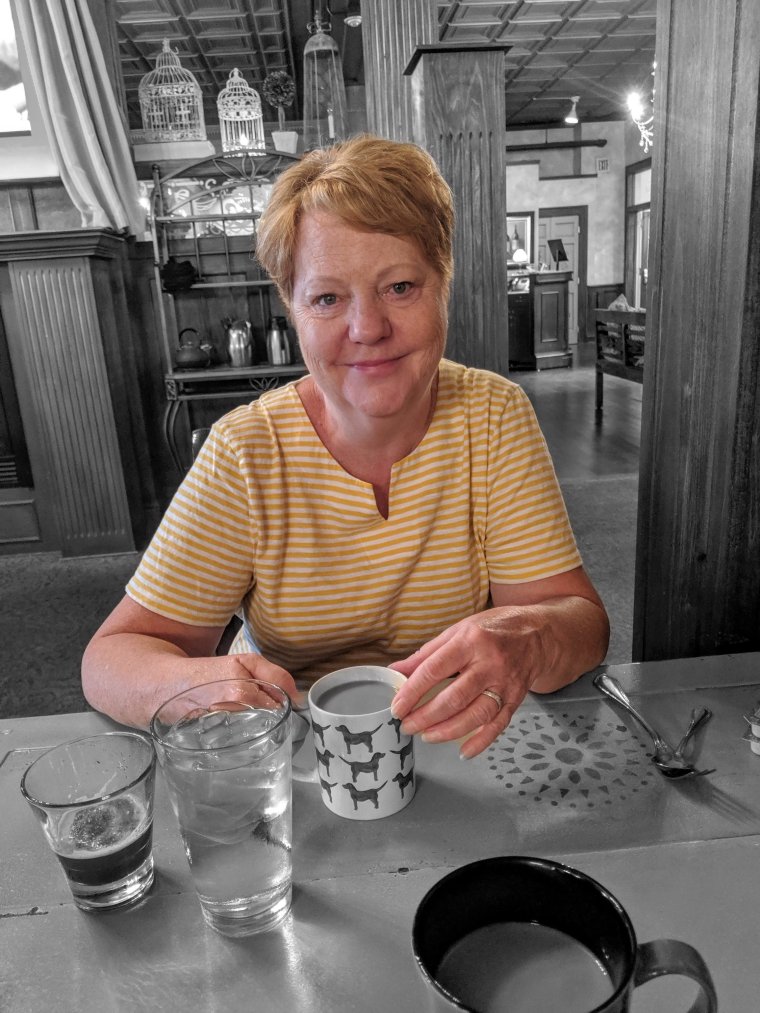
The remainder of our weekend was filled with a lot of walking, admiring the beauty and history of this small town, antiques shopping, and a lot more eating and drinking. Our first stop for lunch on Friday was 128 Pecan, a quirky small restaurant right off Main Street, with THE BEST spinach artichoke dip (hint: there was bacon in it). The food was comforting and delicious. We strolled back down the brick paved Main Street and popped into Anthony’s Desserts where I had a key lime tart and my mom had a chocolate peanut butter cookie. Needless to say, a quick swim in the hotel pool was needed after that. We rounded out Friday with dinner at Sisters, the hotel restaurant. Bubbly rose’ and braised short rib were our top choices and we were not disappointed.

Saturday was ate our way through the town (again) but fortunately our 15,700 steps were able to negate some of it, at least we hoped. We enjoyed a grand breakfast complimentary of the hotel, followed by a tasty lunch (and dinner too, because it was so good) at The Peppermill. For lunch, a fried green tomato BLT with sweet potato fries, and for dinner, cheese ravioli with veggies and balsamic reduction! MmmMmm!

After the matinee showing of the play, we managed to squeeze in a special tea party for two. Hosted at the inn, we drank hot tea and enjoyed petits fours and mini sandwiches, pinkies raised, of course.

Anther highlight of the trip was the neat trinkets and memories we found in the many antique shops we visited. Saturday morning we started the day with an early visit to the local farmer’s market, where we picked up some locally made beef jerky and jewelry. We topped off the weekend with olive oil tasting, art galleries, and an international food shop.

Overall, we had an amazing trip and enjoyed all that Abingdon had to offer. Bursting with history and beauty, this small town was just what we needed for a fun, relaxing, and food-filled getaway. I was so lucky to share this trip with one of my best friends for life and I know Grandma was smiling down!

This slideshow requires JavaScript.

00100dportrait_00100_burst20190810175108674_cover-18107441022225773537.jpg

00100dportrait_00100_burst20190810114306852_cover-effects-12870482785632269746.jpg

img_20190809_150121-effects-11371344308417161417.jpg

heart

St. Patty’s Day Teacher Appreciation

I can’t believe it’s already March!🍀

We are fortunate at our kids’ school to have some pretty amazing teachers and I try to show them how much we appreciate them all year round. They have one of the hardest jobs in the world and it takes a special person to be able to do it. I couldn’t do it. I can barely handle two. 🤷

This is a super easy, inexpensive token of appreciation you can throw together for St. Patty’s Day for anyone you are lucky to have in your life. You can easily change it up to give to your family, friends, etc.

Supplies:

  • Mini gift bags from local crafts store (these are the cutest little bags and come in all colors) – perfect Leprachaun size!
  • Tissue paper
  • Stickers
  • Card stock or scrap book paper
  • Twine or string
  • Hershey’s gold nuggets candy

If you want me to email you the template I used, please use Contact section and I will email it! 🍀🌟🍫

Supercalifragilisticexpialidocious.

Is anyone else freaking out about the upcoming release of the new Mary Poppins movie, Mary Poppins Returns?!?! It hits theaters December 19th, an early Christmas present for me! Mary Poppins is my all time favorite movie, so as an ode to the MP revival, I thought it would be fun to share how I captured tidbits of the fantasy of MP in my little girl Evie’s nursery.

When I was feverishly searching Pinterest for design ideas for little girl’s nursery, I came across something that sparked the idea of imparting a little Mary Poppins magic into her room. Thus, that’s where it began and here is a glimpse of the outcome. I cannot wait for the day when I get to watch this movie with Evie – I hope she loves it as much as I do!


psx_20181130_134923-16230189417019728335.jpg

psx_20181130_1347287843572384153671378.jpg


  • “Supercalifragilisticexpialidocious” Print (11″x14″) – BubbleGum Years etsy shop 
  • Distressed white mirror – Hobby Lobby
  • Antique wall spoon – Hobby Lobby
  • Lamps – were my Grandma’s and we spray painted them pink
  • Clouds wall decal – RoomMates Wall Decals
  • Cloud wall bookshelf – Target
  • Let’s go fly a Kite – DIY project with cardboards, scrapbook paper, and ribbon
  • Penguin and Umbrella print (flanking mirror) – DIY project with leftover paper
  • Spoonful of Sugar jar – Home Goods
  • Pottery Barn Crib
  • Ikea Hemnes Dresser
  • Little white side table – from local antique store Well Worth It 
  • Pink shag rug – Walmart

img_20181128_1424411788004949716425721.jpg

What are some of your favorite childhood movies that you still cherish today?

heart

Crafty Thanksgiving Tradition

It’s nearing that time of the year where family traditions are shared amongst your loved ones. In preparation for the upcoming turkey day, I’d love to share with you a tradition that I’ve started with my kids, which carried over from something I used to love doing as a child and continued into my adult life. Thanksgiving name place cards. I actually have no idea how it started – it probably began one year with me coloring everyone’s name on an index card, glorifying them with fall related stickers. Either way, I remember it being something that I looked forward to doing every Thanksgiving. Now with my kids, it’s something fun and creative that we can do as a family and also creates a keepsake for years to come.

The basics:

  • Start with some form of card stock, scrapbook paper, or even buy cheap pre-made place cards from local craft store.
  • Write the names on the cards.
  • Decorate with fun stickers, glitter, feathers and other crafty add-ons.
  • Hint: tiny hands make for cute turkeys!

Here is one of my favorites from recent years past made courtesy of Brooks.

screenshot_20181107-135817~26826369713140724766..jpg

We cut glittery scrapbook paper into squares, added painted hand turkey with googly eyes, and finished them off with more glittery pumpkin stickers and glitter glue names.


Last year we took the easy road (aka waited until the last minute and also had a 7 month old) and bought the pre-made fold over cards and added giant 3-D turkey stickers.

This year we are going to “pimp out our pine cones”! Since there is no shortage of pine cones in Asheville, which is where we are travelling this year, I thought this would be an easy and cheap project. Going on the hunt for pine cones will be half the fun and I think any kid would love to paint them and who knows, maybe add a little sprinkle of glitter.

I’d love to hear about your family’s holiday traditions and ideas for place cards. Feel free to leave a comment below. Happy Turkey Day!

Don’t play with your food…or do!

As a mom of two, I know how hard it can be to get your kids to eat their food at meal time. Dinner is by far our most challenging meal, as many of you can probably relate. After a long, stressful day at work, the last thing you want to do is have to figure out a dinner that you can throw together in less than 30 minutes that will make everyone happy. Add on the juggle of a 4 year old and 18 month old, and dinner prep is not usually something I look forward to either. It’s on nights like these, when I have nothing planned for dinner that I like to turn to some of my easy, go-to staples. And when you can throw in a little FUN, sometimes it turns the dinner challenge into a dinner winner. Tonight, we incorporated a little ghoulish Halloween fun into our dinner!

On the menu…

  • GHOST TOAST with extra GHOST EYEBALLS – any kind of bread toasted (we had pumpkin toast), spread with cream cheese and 2 blueberries as eyes. Extra “eyeballs” on the side
  • SCARECROW BRAINS – scrambled eggs with your favorite cheese
  • Magical WAND – fully cooked sausage links, heated in pan (hint: I told Brooks the magic only lasts for 3 spells, and then it’s gone – otherwise your little goblins will never eat it…didn’t foresee this coming)
  • WITCHES BREW – milk or drink of choice; kids can stir a little Nesquik into their cauldron if you choose


If you’re looking for some other ways to incorporate some fun into your food here’s what you need:

  1. Start with a vessel — whole grain bread, bagels, tortillas, pizza crusts, etc.
  2. Add a spread aka “the glue” — hummus, cream cheese (all flavors), peanut butter, tomato sauce, pesto, etc.
  3. Add whatever fun toppings you want — fruits, veggies, shredded cheese, pepperoni, beans, etc. Hint: letting your kiddos help “decorate” their creations gets them involved, which I find makes them want to try new things. Win win!
  4. Be creative! I keep an abundant amount of cookie cutters on hand to cut out fun shapes. Some of the faves include the teddy bear, heart, car, dinosaur, apple, flower, and airplane.
  5. Feel free to share some of your favorite fun food ideas — I would love to add them to my list!

What doesn’t kill you makes you STRONGER.

This mantra is something I’ve always held on to when times get tough. I’d like to dedicate this post, in honor of breast cancer awareness month, to my momma, and tell you a little bit about her, and how she shaped me into the woman I am today.

The date was August 2014. James and I were sitting on the couch watching tv. There weren’t many other activities I wanted to partake in while being 8 months pregnant. My cell phone rang and it was my mom, which was not unusual since we talk at least a couple of times a week. But the one thing I did know, because she is a horrible liar and her voice tells all, was that something was wrong. Very wrong. The news, which hit me like a Mack truck crashing into every bone in my giant pregnant body, was devastating. My mom had cancer. Breast cancer. What?! No one in our family has had breast cancer, so it came as quite a shock. It was nearly impossible to digest. While I held it together on the phone, asking her all the hows, whens, and whats, as soon as the call was over, I broke down, collapsing into the arms of my husband. Fortunately, James had already talked to my parents and knew what was coming. I couldn’t even begin to believe what I had just heard.

Just a few weeks later my mom underwent her first surgery, the first step on her journey to fighting back against cancer. And just a couple of weeks later, her first grandchild was born. Never in my life have I experience such a dynamic shift in emotions, so I cannot even fathom the roller coaster my mom was on. Her trek continued when she underwent another surgery, followed by 6 chemo treatments, and 32 radiation treatments, bringing her treatment course to nearly a full year. There were ups and downs with some mountains and trenches along the way, but my mom never gave up. I remember talking to her often and while she was generally in good spirits the day before chemo, she was a mess the days following, her body battling to keep up with the chemo she had just received.

While I cannot even begin to tell you the depths of her story, or the highs and lows she went through physically, emotionally, and spiritually, I can tell you this: my momma is a ROCKSTAR. Three years later and she remains cancer free! Reflective of her positive spirit in life, she never once complains about anything or anyone (well sometimes about my dad…lol). She has ALWAYS been there and continues to be there for me and my bros – I only wish that I can be half the mom she is. She epitomizes the term hard worker. She has worked her butt off for everything that she has, earning every piece of it. One of my fondest memories growing up as a young woman was going into my mom’s office at work. It oozed dedication, confidence and joy — all of which I think she instilled in my own work ethic. She is selfless. I mean the lady was handed a cancer diagnosis and she was more worried about telling me because she didn’t want it to affect the pregnancy or baby. She never ceases to amaze me.

psx_20181009_2209278701275578910462533.jpg
Twinning.

Often times we coin cancer survivors as “fighters”. Well, for my mom, it wasn’t in August 2014 when she started fighting. She has always been a fighter. She did not let her cancer diagnosis define her. Instead, she redefined cancer. She’s a warrior. For me, for my brothers and my dad, her grandkids, her family, her friends, her church, and anyone else she has a relationship with in her life. She will continue to fight because that’s who she is. She doesn’t give up on anyone. You can only be so lucky to have her as a part of your life. I know I am, and I thank God for her everyday. Despite this journey being one of the most difficult things in my life, I am so grateful for my mom, and for the lessons she has taught me throughout this journey and life. Remember, what doesn’t kill you makes you stronger. I love you Momma/GiGi!

psx_20181009_2211402125109202410743143.jpgFor those of you reading this who are cancer warriors, or have your own warriors in your life, I praise you and envy your strength and tenacity. You are awesome.

0_uq2tgiozq0_fjxli2427100780275296581.png

Birthday Kabobs!

Birthday Kabobs
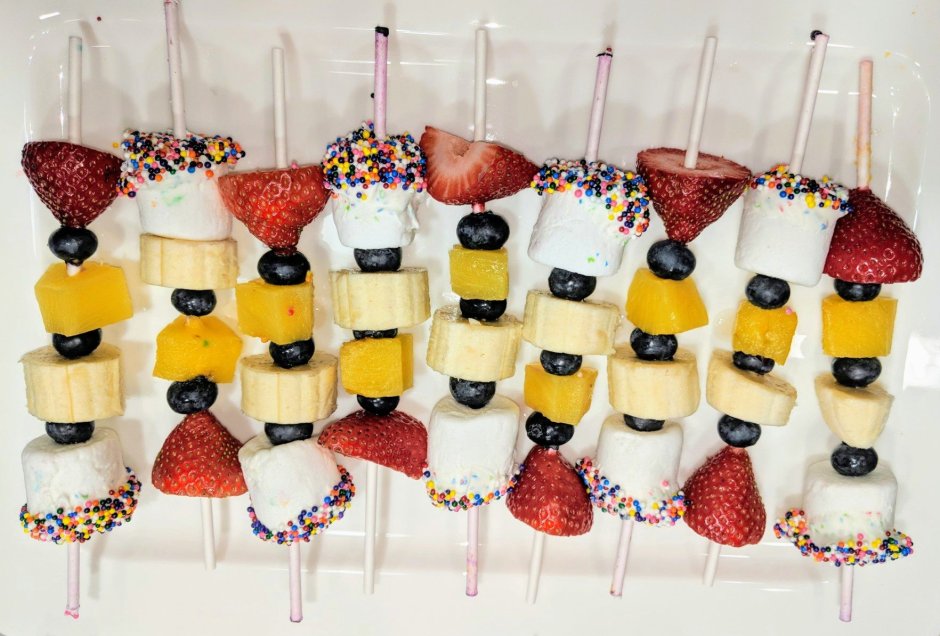
Allow me to introduce you to our newly turned 4 year old B-Man, formerly Baby Brooks (but will always be BB if you ask his daddy). For the past 3 years, we have done the obligatory cupcakes or cookies for his class birthday celebration. Although I may groan about it, not recognizing what I get myself into sometimes, I secretly love doing it. But this year I vowed to do something different. Tired of the fake-colored, sugary store-bought treats, I feverishly searched Pinterest for “alternatives to school cupcakes”. While I did not find exactly what I was looking for, partly because I did not know what I was looking for, I did come away from my search with some ideas.

  1. I wanted to do something fun for the kids and something B could help me make for his friends. That’s how we came up with the kabob idea.
  2. I wanted something decently healthy, so fruit was the focus.
  3. It also had to have a “birthday flare” to it, so of course, sprinkles came to mind. And what could I douse in sprinkles, that would also fit on a kabob? One of Brooks’ favorite treats, MARSHMALLOWS.
  4. Thus, 1+2+3 = Birthday Kabobs!

img_20180926_093027_01~26851884667973013046..jpg

These treats were super easy to make, and a really fun way to get your kiddos involved; only if you don’t mind them eating the project along the way, as evidenced above. Also, for those fans of the show Umizoomi and Milli’s pattern power (in your best singing voice), this activity provides a great opportunity for your kids to learn about patterns. And yes, I realize I missed a blueberry on one – oops!

Here’s what you need to make the kabobs:

  • Assortment of whatever fruit you like that can be skewered. We used strawberries, bananas, blueberries, and canned pineapple chunks.
  • A bag of big marshmallows
  • Sprinkles
  • Chocolate candy melts – you can find these at your local craft store in all colors. I used the white chocolate party melts.
  • 8″ treat sticks – also found at local craft store. They look like the white cake pop sticks.

And here is how:

  1. Wash hands 🙂
  2. Have your marshmallows ready to dip, and pour the sprinkles out on a plate or any shallow pan with sides.
  3. Melt the chocolate candy according to the directions on the bag. You have to work kind of fast before the chocolate hardens again, but even if it does, just nuke it again to melt it.
  4. Dip the ends of the marshmallows into the chocolate, then the sprinkles, and set on wax paper. Repeat for as many as you need. We made 20 kabobs, but probably had 25 marshmallows to begin with. They seemed to disappear along the way.
  5. Wash and prep the fruit. Trim the tops off the strawberries, and slice the larger ones in half. Cut the bananas into one inch rounds.
  6. Skewer the fruit and end the kabob with one of the birthday marshmallows. Brooks helped me with making the marshmallows but I skewered the actual fruit, while he helped me with the pattern.
  7. Enjoy! I will admit I was a little nervous about Brooks’ friends just eating the marshmallows and leaving the fruit on the stick, but I was pleasantly surprised that every kid (all 19 of them) ate every.single.bite. of the kabobs. And the teachers enjoyed them too. They were a hit and Brooks was so proud to be able to say he helped make them!

Note: you can make these ahead of time, and refrigerate them for the next day. Just be sure to tightly wrap them so the marshmallows don’t dry out.

img_20180926_093031_01~25933381728019758344..jpg